
There are many reasons to prepare a custom image of a computer. One example is when creating an image to be used as a training environment. Laboratory-based training often involves provisioning virtual machines that already contain a uniform set of software and configuration.
In the good old days of desktop virtualization, an already existing virtual machine can be “cloned” and the resulting image can then be distributed.
Nowadays that there are cloud-based alternatives like Azure Virtual Machines, and the cloning trick is no longer applicable. Instead of cloning, a managed image can be created that would serve as a “template” for new VMs to be created.
In this article, you will learn the step by step process of creating new Azure virtual machines based on a custom image.
Prerequisites
Before you begin, here are some things you will need to follow along with the examples.
- An Azure subscription.
- An Azure virtual machine to be used as a base image.
- Windows PowerShell 5.1 or PowerShell Core 6+.
- Azure PowerShell module.
- Must be logged in to Azure PowerShell.
Preparing the Azure Virtual Machine Image
First things first, to create a new virtual machine based on an image, the image must be prepared using Sysprep and Azure PowerShell.
In this article, a Windows 10 virtual machine will be used as an example of how to preparing a VM image. This virtual machine is already pre-setup with all the software, documents and modules required.
Using Sysprep to Generalize the Operating System
Generalizing the OS resets the Windows installation and removes computer-specific details, including device drivers and SID.
For more information on how to use Sysprep to generalize a Windows machine, please refer to Sysprep (Generalize) a Windows installation .
To generalize the OS, only one line of command is needed. Run this command below in an elevated command prompt while logged in to the VM. The Sysprep options used in the command will generalize the OS, shutdown the computer and sets the next boot to show the out-of-the-box experience (OOBE).
c:\windows\system32\sysprep\sysprep.exe /generalize /shutdown /oobe
The screenshot below shows the Sysprep progress.
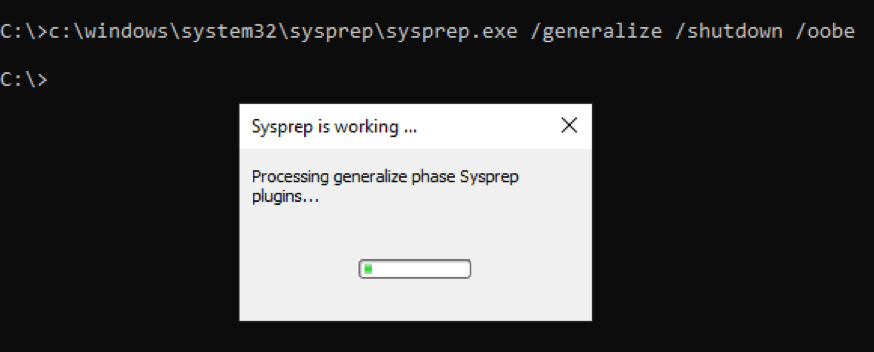
Generalizing a Windows OS Image with Sysprep
Do not attempt to restart the virtual machine after it is generalized. Doing so breaks the “generalized” state of the OS and you will have to re-run Sysprep again.
Creating a Generalized Azure Virtual Machine Image
The virtual machine’s operating system is now generalized. The next step is to capture a generalized image of the base virtual machine. One way it is done is by running some PowerShell commands.
To create the VM image using PowerShell, follow these next steps:
First, define some variables that are relevant to the virtual machine. These variables will store the values of the resource group, virtual machine name, location and the intended name for the image to be created.
See the example below. Replace the values as needed, except for the $vmID.
# The name of the base VM.
$VMName = "demo-vm"
# The name of the resource group where the VM belongs to.
$ResourceGroupName = "demo_group"
# The location where the image will be created.
$Location = "EastUS"
# The intended name of the image to create.
$ImageName= "base_demo_image"
# Get the ID of the virtual machine
$vmID = (Get-AzVm -ResourceGroupName $ResourceGroupName -Name $VMName).ID
Next, to ensure that you don’t run into errors, make sure that the virtual machine is stopped and deallocated. Use the command below to do so.
Stop-AzVM -ResourceGroupName $ResourceGroupName -Name $VMName
Stopping the VM may take several minutes, please be patient.
The screenshot below shows that the VM was stopped successfully.
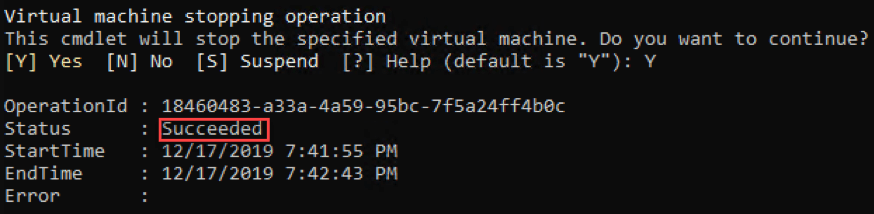
Stopping the Azure VM
This next command will mark the virtual machine status as Generalized. The Generalized status indicates that the virtual machine is a valid source for creating a new virtual machine image.
Use the code below to set the VM status as Generalized.
Set-AzVm -ResourceGroupName $ResourceGroupName -Name $VMName -Generalized
Next step is to create the image configuration and store it in the $newImage variable. Use the command below to do that.
$newImage = New-AzImageConfig -Location $location -SourceVirtualMachineId $vmID
Finally, it’s time to create the image using this next command.
New-AzImage -Image $newImage -ImageName $ImageName -ResourceGroupName $ResourceGroupName
The image creation task may take several minutes to complete depending on the size. In this example, it took about 10 minutes for the command to complete.
The screenshot below shows that the image creation was successful as stated in the ProvisioningState property.
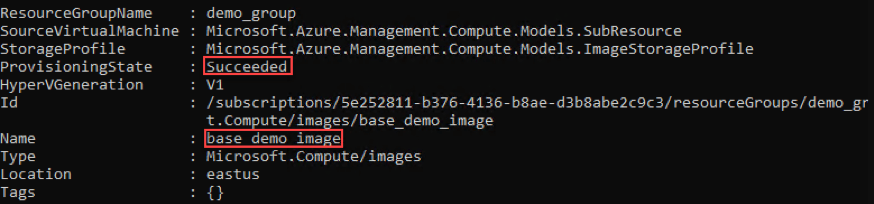
Creating the VM image using PowerShell
To further confirm that the image was created, check the existence of the new image using the Get-AzResource cmdlet specifically targeting the new image name.
Get-AzResource -ResourceGroupName $ResourceGroupName -ResourceName $ImageName
As you can from the screenshot below, the result shows the new image with the name base_demo_image.

Finding the image resource using PowerShell
Creating New Azure Virtual Machines using the Prepared Image
So far, you’ve learned how to create the virtual machine image that will be the basis for further virtual machine deployments. In this section, you will create several virtual machines using the prepared image as the source.
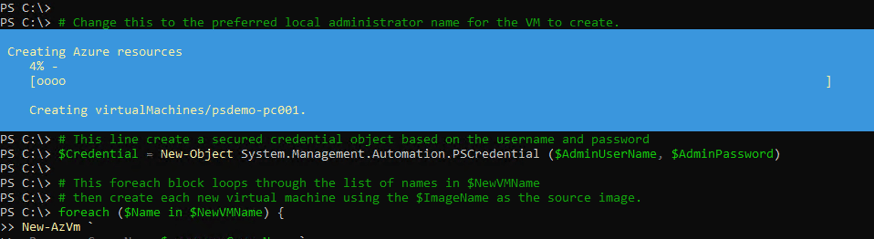
Take the script below and use it to create new VMs. You can learn about each line does by referring to the comments above them. Do not forget to change the values of $vmName, $ResourceGroupName, $ImageName, $Size, $OpenPorts, $AdminUserName and $AdminPassword.
# ---------START MODIFICATION HERE---------

# Add the name or names of the new VMs to be created.
$NewVMName = @('psdemo-pc001','psdemo-pc002','psdemo-pc003')

# Change this to the name of the resource group.
$ResourceGroupName = 'demo_group'

# Change this to the name of the VM image
$ImageName = 'base_demo_image'

# Change this to the preferred size of the VM to create.
$Size = 'Standard_B1ms'

# Specify the ports to open.
$OpenPorts = @('3389')

# Change this to the preferred local administrator name for the VM to create.
$AdminUserName = 'superadmin9876'

# Change this to the preferred password for the local administrator.
$AdminPassword = ConvertTo-SecureString 'XLLBaNH7LJt2eUNr' -AsPlainText -Force

# ---------END MODIFICATION HERE---------

# This line create a secured credential object based on the username and password
$Credential = New-Object System.Management.Automation.PSCredential ($AdminUserName, $AdminPassword)

# This foreach block loops through the list of names in $NewVMName
# then create each new virtual machine using the $ImageName as the source image.
foreach ($Name in $NewVMName) {
New-AzVm `
-ResourceGroupName $resourceGroupName `
-Name $Name `
-ImageName $ImageName `
-Location "East US" `
-VirtualNetworkName "$($resourceGroupName)-vnet" `
-SecurityGroupName "$($Name)-nsg" `
-SubnetName 'default' `
-PublicIpAddressName "$($Name)-ip" `
-DomainNameLabel $Name `
-Size $Size `
-Credential $Credential `
-OpenPorts $OpenPorts
}
In PowerShell 7.0 Preview 3+, you can improve the performance of the script by using the [ForEach-Object -Parallel](https://devblogs.microsoft.com/powershell/powershell-foreach-object-parallel-feature/) feature. Doing so will create the VMs in parallel resulting in a decrease in wait time.
Copy/paste the script into the Azure PowerShell session. Once it runs, you will see a progress indicator as shown in the screenshot below.
New Virtual Machines being created
The provisioning process will take several minutes, longer if you have more than one VM specified to be created. In this example, the three virtual machines were created within approximately 20 minutes.
When completed, you can see from the screenshot below that the new virtual machines are created.
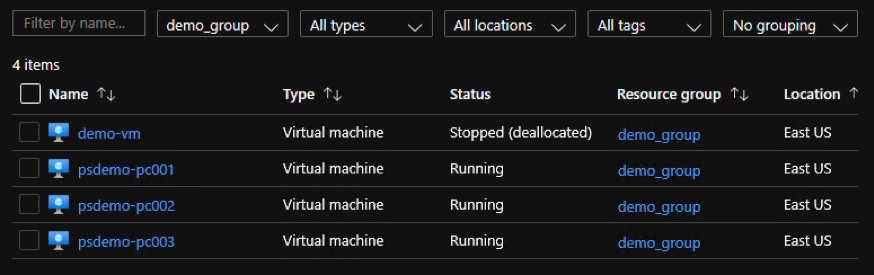
New virtual machines are created
It is recommended to stop and deallocate these new VMs to avoid incurring unnecessary charges. You can stop them from the Azure portal or PowerShell using this script.
$ResourceGroupName = 'demo_group'
$NewVMName = @('psdemo-pc001','psdemo-pc002','psdemo-pc003')
$NewVMName | % {Stop-AzVM -ResourceGroupName $ResourceGroupName -Name $_ -Force}
Summary
In this article, you learned how to prepare a virtual machine image by generalizing both the operating system and the virtual machine. Then, you learned how to capture an Azure VM to create a base image for further deployments. Lastly, you learned how to create multiple virtual machines using the prepared image using PowerShell scripting.
Remember that what you learned in this article are only the basics. As you grow in your role and you keep using PowerShell to try and automate VM provisioning, you will find that there are a lot more that can be done. You will eventually discover pitfalls and learn the tricks to efficiently work around them, or design better scripts.
Keep practicing and thank you for reading!