
Imagine that your company has multiple Microsoft Azure subscriptions, each of which is owned by a particular cost center. You learn through the proverbial grapevine that the development team, who owns a subscription named vs-pro-50, is not following your governance policy that requires all vs-pro-50 resource groups to be tagged with the costCenter:Development key-value pair.
The pain point here is you find that developers either "forget" to add this tag to resource groups, or that some developers mistype either the tag and/or the value, leading to inconsistent cost reporting.
Today, I'll teach you how to fix this problem by implementing an Azure Policy that enforces the presence of a particular taxonomic tag on a resource group. Let's get to work!
Setting Up Our Policy Definition
Before we commence the step-by-step, here's the high-level workflow of what we'll seek to accomplish today:
- Duplicate a built-in policy definition.
- Customize the policy definition to suit our needs.
- Assign the policy at the subscription level.
- Test that the policy enforcement works.
First log into the Azure portal with a privileged account, then browse to Policy, and select the Definitions blade. Use the Search filter to look for the keyword tag.
The built-in policy we're interested in is called Require tag and its value on resource groups. Click that policy, and then click Duplicate definition in the toolbar.
On the Require tag and its value on resource groups - New Policy definition blade, fill in the form using the following property guidance:
- Definition location: Note that you can make the new policy available at the management group or subscription scope. We want to scope this definition at the subscription level.
- Name: Edit the name to make it distinct from the built-in policy template.
- Category: I suggest you create a custom category to store your custom policy definitions
As you can see in the Policy Rule section, Azure policy definitions are represented in JavaScript Object Notation (JSON) format, like most other Azure artifacts.
I'll show you my custom policy definition in Figure 1, and explain how it works:

Figure 1. Our custom Azure policy definition.
- Line 2: The mode is either all, which evaluates all resource groups (this is what we want), or indexed, which evaluates only resource types that support tags and location
- Lines 4-15: The if block must evaluate to true for the policy effect to be applied. Here the condition states "Evaluate 'true' if the resource type is a resource group and that resource group does not contain the tag name and value specified in the parameter"
- Lines 16-18: Azure Policy has many effects; here we want to prevent deployments that do not include the required tag and value
- Lines 20-34: Parameters are implemented when we assign the policy; here we declare the parameter names and associated data types. Note that we're not providing the actual tag name and tag value yet--these parameter names are essentially labels.
Click Save to finish the configuration.
Assigning the New Policy
Now navigate to the Assignments blade in Azure Policy and click Assign policy. By the way, an initiative is a container object that enables you to assign multiple related policies at once. Here we'll deploy only our custom policy.
Fill in the Basics blade:
- Scope: Choose your target Azure subscription. Note that you can assign a policy at the management group, subscription, or resource group scope. Azure Policy flows by inheritance from higher to lower management scopes.
- Exclusions: We could exempt certain existing resources from the policy. We don't want to do that here.
- Policy definition: Filter the Type field to Custom and select the custom policy we created a moment ago
- Policy enforcement: Enabled
Click Next and then type the required tag name and value. Recall that we named the parameters the same as our expected values for convenience.
Click Next to reach the Remediation blade, and then click Review + Create. We don't need a Managed Identity here; a managed identity is an Azure Active Directory service principal Azure would use as security context for resource creation actions.
As shown in Figure 2, you should now see the policy assignment on the Assignments blade.

Figure 2: Our assigned policy
According to Microsoft, it can take upwards to 30 minutes for the policy to go into effect.
To make sure the policy works, go ahead and attempt to create a resource group in your target subscription that does not contain your required tag and value. The deployment should fail, and you should see an error message similar to that shown in Figure 3.
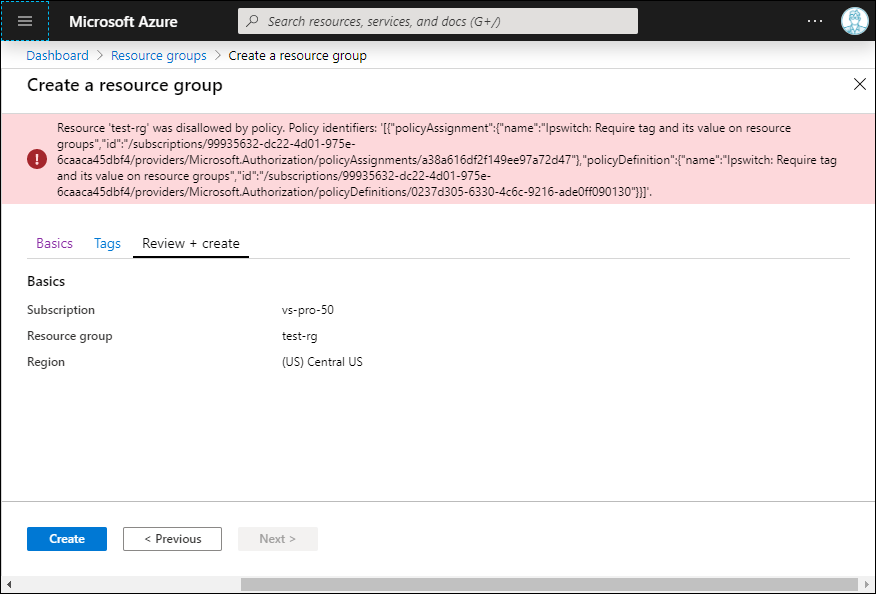
Figure 3. The Policy Works as Expected
Now retry the deployment, this time specifying the proper tag. The deployment should succeed.
Remediating Existing Resource Groups
If you check the Compliance blade in Azure Policy, you should see 100 percent compliance status. We now know that all future resource group deployments in this subscription will contain the required tag and value.
But what about existing resource groups? How can we retroactively enforce the policy on those resources? In this case we can either (a) edit our existing policy; or (b) start from scratch by duplicating the Add or replace a tag on resource groups built-in policy.
The main change to our current policy lies in its effect. Take a look at the code in Figure 4, and I'll explain:

Figure 4. We use the modify Azure policy effect to remediate existing resources.
In this example, we call the modify effect along with the addOrReplace operation to ensure that the resource group includes the values provided for the tagName and tagValue parameters.
In this case, we need to instruct Azure Policy to create a remediation task and a Managed Identity under whose security context the tag addition will take place. As you can see in Figure 5, the new managed identity will be granted Contributor role membership at the target scope.
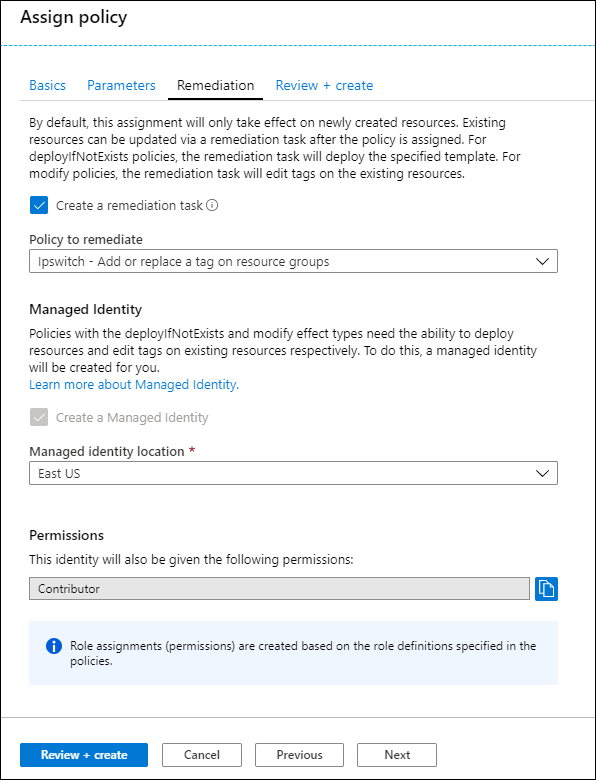
Figure 5. Configuring a Remediation Task and Managed Identity.
If you decided to define a new policy, you can browse to the Azure Policy Assignments blade, open the context menu for the old policy, and select Delete assignment. Note that deleting a policy assignment does not delete the underlying definition; to that, delete the definition from the Definitions blade.
You can follow remediation task progress by switching to the Remediation blade and selecting the Remediation taskstab in the Azure portal.
For Further Learning
Cool. So now you have a great head start on defining, assigning, tracking, and revising a policy in Microsoft Azure. Let me leave you with some hand-selected resources for your further exploration:
Details of the policy definition structure - Azure Policy | Microsoft Docs
Understand how effects work - Azure Policy | Microsoft Docs
Remediate non-compliant resources - Azure Policy | Microsoft Docs
Azure/azure-policy: Repository for Azure Resource Policy samples