
There are many ways to monitor Office 365. One of those ways is the Office 365 Service Health dashboard. Located in the Microsoft 365 admin center under the Health section, this dashboard is a great way to get a birds-eye view of Office 365 services. But the graphical dashboard leaves a lot to be desired when you need to monitor resources at scale or to automate that monitoring.
Microsoft has released the Office 365 Service Communications API V2 to solve this problem. This API allows for retrieving the Office 365 service health status programmatically.
Using this API with PowerShell scripting, you can automate the monitoring for changes in the Office 365 service health status. You can develop your scripts to send these status updates by email, MS Teams notification, or even to Slack!
In this article, you’ll learn how to retrieve the Office 365 service health status using the Office 365 Service Communications API and PowerShell.
Getting Prepared
This article will be a walkthrough. If you intend to follow along, make sure you have the following prereqs set up ahead of time.
- An Office 365 Tenant. Request for a trial if you do not have it yet.
- A script editor, like Notepad++ or an Integrated Scripting Environment (ISE) like Windows PowerShell ISE and Visual Studio Code.
- Windows PowerShell 5.1 or PowerShell Core 6+.
- A registered app in Azure AD with proper permissions. Please refer to Register a new application using the Azure portal if you don’t know how to do that.
- The registered app must have the following settings.
– API to use - Office 365 Management API
– API permissions to add - ServiceHealth.Read
– API permission type to select - Application Permission
- The registered app must be *granted admin consent.*
- The Application ID, Directory ID and the Client Secret of the registered app.
Knowing the API Basics
To request information from the Office 365 Service Communication API, you must take note of the key information that comprises a request.
- The standard API URL to use is https://manage.office.com/api/v1.0//ServiceComms. You can find the Tenant ID in the Azure Active Directory admin center.
- An access token is required. You will learn how to acquire access tokens in the next section.
- The different path to append to the end of the API URL. This represents which information is being requested. These paths are:
– /Services - Gets the list of subscribed services
– /CurrentStatus - Get a real-time view of current and ongoing service incidents.
– /HistoricalStatus - Returns the historical status of the Office 365 services
– /Messages - Returns the messages about the Office 365 services
For example, to get the list of services the request URL would be https://manage.office.com/api/v1.0//ServiceComms/Services
Acquiring Access Tokens
Once you’ve satisfied all the requirements, the next step is to acquire the access token that will be used to authorize the requests.
Copy and paste the code below into your script editor. Then, change the value of the $TenantID, $ClientID and $ClientSecret variables with the ones from your registered app. If you don’t have this information, refer to this link to find out how and where to get them.
Once you’ve updated the variables, paste the code into your PowerShell session to run it. The code requests an access token and stores the returned value to the $token variable.
# CHANGE THESE VALUES
$TenantID = 'TENANT-ID' #The Directory ID from Azure AD
$ClientID = 'CLIENT-ID' #The Application ID of the registered app
$ClientSecret = 'CLIENT-SECRET' #The secret key of the registered app
# ------------------------------------------------------
# DO NOT CHANGE THESE
$body = @{grant_type="client_credentials";resource="https://manage.office.com";client_id=$ClientID;client_secret=$ClientSecret }
$oauth = Invoke-RestMethod -Method Post -Uri "https://login.microsoftonline.com/$($tenantID)/oauth2/token?api-version=1.0" -Body $body
$token = @{'Authorization' = "$($oauth.token_type) $($oauth.access_token)" }
# ------------------------------------------------------
The screenshot below shows what the contents of the token would look like.
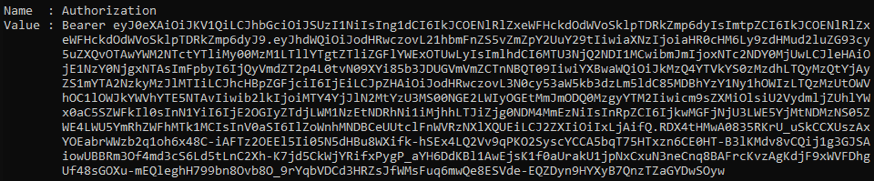
Contents of the access token
- Requested access tokens are only valid for 60 minutes. Once it expires, a new access token must be requested.
Getting the Current Office 365 Service Health Status
Getting the current health status will give you the real-time status of the Office 365 services within the previous 24 hours.
This line of command will get a real-time view of current and ongoing service incidents. Copy the code below and paste it into your PowerShell session.
$ServiceStatus = Invoke-RestMethod -Uri "https://manage.office.com/api/v1.0/$($TenantID)/ServiceComms/CurrentStatus" -Headers $token -Method Get -Verbose
The results of the command above saved in the $ServiceStatus variable. Now you can display the results based on your preference. For example, the code below outputs the IncidentIDs, WorkloadDisplayName and Status properties.
$ServiceStatus.Value | Format-Table IncidentIDs,WorkloadDisplayName,Status
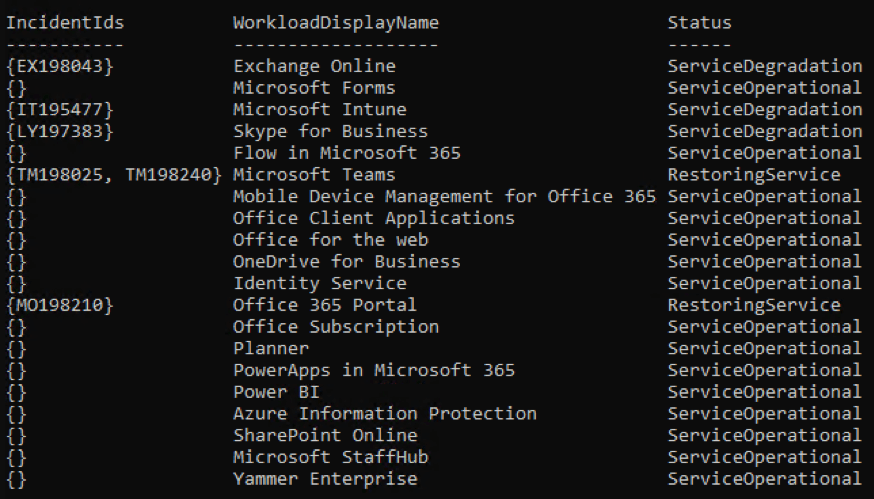
Displaying all available Services with Status and Incident Ids
The WorkloadDisplayName property identifies the name of each of the Office 365 services.
The IncidentIds property, as the name implies, contains the incident IDs associated with each service. This property is usually populated when the Status is not equal to ServiceOperational. You can learn more about the different status definitions by following this link.
Getting Service Incident Messages
Microsoft is constantly posting updates for existing or new incidents in Office 365 services. These messages can also be retrieved from the API. Use the code below to get all messages about service incidents.
The first line creates the filter string to filter the results based on MessageType value. The command in the second line combines the API URL path and the filter string. And the last line invokes the request.
Follow this link to know what other property filters are available for filtering messages.
$filter = '?$filter=MessageType eq Incident'
$uri = ("https://manage.office.com/api/v1.0/$($TenantID)/ServiceComms/Messages" + $filter)
$Messages = Invoke-RestMethod -Uri $uri -Headers $token -Method Get
The results of the command above is stored in the $Messages variable. The command will return a lot of data, you will need to use proper filtering to display it correctly as you’ll learn in just a second.
In the previous section where we queried the current service health status, one of the returned results is incident ID LY197383. We’ll use it as a reference for the next example.
The code below will filter the contents of the $Messages variable to return only the value whose ID is equal to LY197383.
$messages.Value | Where-Object { $_.Id -eq 'LY197383'} `
| Select-Object Id,WorkloadDisplayName,Title,StartTime,EndTime,Messages
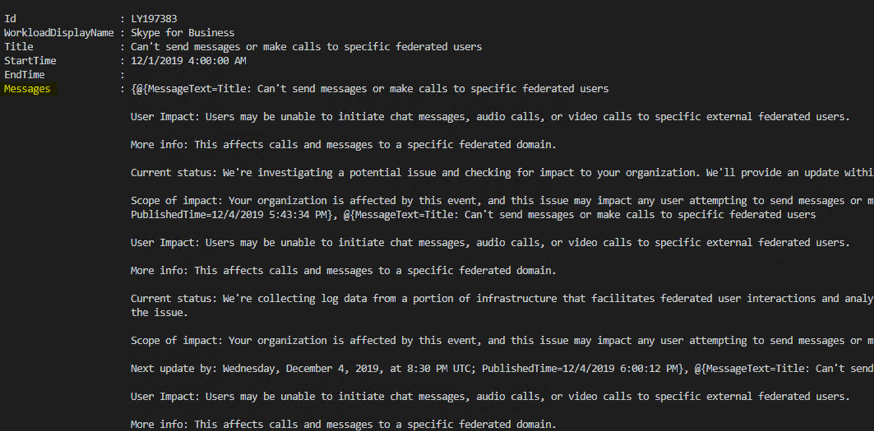
Displaying the information of specific advisory raised for Skype for Business service
All updates released by Microsoft related to LY197383 advisory will be stored in the $Messages variable. This variable contains PublishedTime (DateTimeOffset) and MessageText (String) properties that can be used in filtering when you need to display the latest update or backtrack the history of the service.
To view the latest message of the LY197383 advisory for Skype for Business service, copy/paste these commands below in your PowerShell session.
The first line of command will filter the messages based on advisory Id LY197383 and store it in $SFB variable. The second command will get the total number of available messages and subtract it by 1 to get the highest value and store it in $msgCount variable. The third command will use the value of $msgCount variable to point to the highest index in the array which holds the latest value of the message for the advisory.
$SFB = $messages.Value | Where-Object { $_.Id -eq 'LY197383'}
[int]$msgCount = ($SFB.Messages.Count) - 1
$SFB.Messages[$msgCount].MessageText
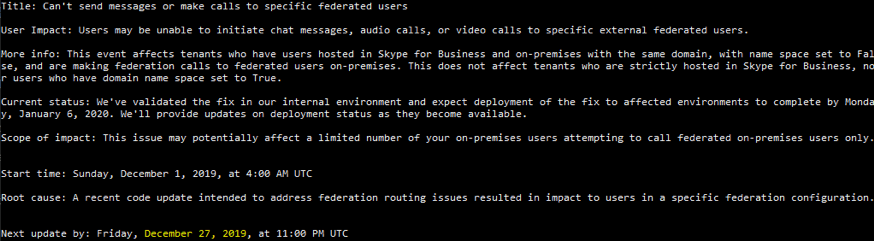
A result showing the latest message of incident ID LY197383
Getting the Historical Status of Office 365 Services
Getting the historical status of Office 365 services is useful when you want to review how the service performed within the previous 30 days. It can give you a daily overview of the status of each service.
This code below retrieves all the historical status of all the Office 365 services available. The results are saved in the $HistoricalStatus variable that you can filter or export later on.
$HistoricalStatus = (Invoke-RestMethod -Uri "https://manage.office.com/api/v1.0/$($TenantID)/ServiceComms/HistoricalStatus" -Headers $token -Method Get)
Once you have the results, it can be filtered to get only the information that you deem relevant. For example, the code below will display the historical status of Skype for Business Online service for the last 7 days. The data will be filtered using WorkloadDisplayName and StatusTime properties.
$Service = "Skype for Business"
$FilterDate = (get-date).AddDays(-7)
$HistoricalStatus.value | Where-Object {$_.WorkloadDisplayName -eq $Service -and $_.StatusTime -ge $FilterDate} | Sort-Object StatusTime -Descending
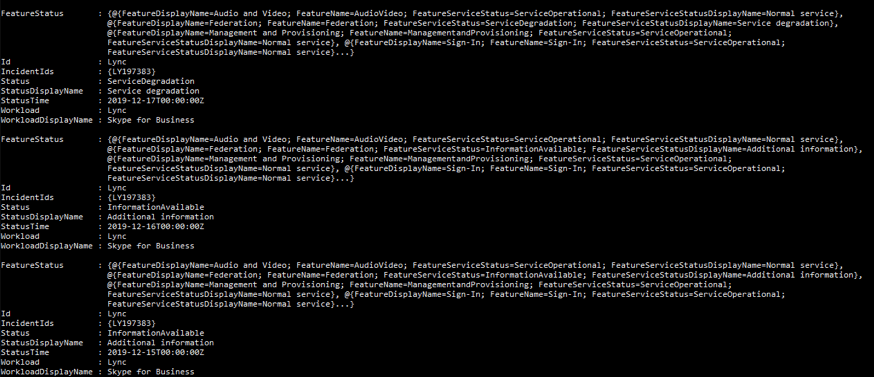
Displaying the historical status of the Skype for Business service
Summary
In this article, you’ve learned how to get the health status of the Office 365 services using the Office 365 Service Communications API. You’ve also learned how to generate an access token that is used to authorize the requests against the API.
You’ve also seen how to use the returned results of the different types of requests such as the current status, incident messages, and historical details of each Office 365 service.
I hope that this article has helped you in getting started making your own Office 365 service health monitoring and reporting scripts. Thank you for reading!
References
How to check Office 365 service health
How to Register an App in Azure AD
Office 365 Service Communications API reference