
Deploying Azure Virtual Machines is easy enough given the tools provided by Microsoft. You can edit properties, tags or even resize Azure VMs after deployment. But, renaming Azure VMs or any other resources is not allowed.
Microsoft must have a very good reason for not including this as a built-in feature. Until this becomes an official feature, admins are left to their own devices on how to rename Azure VMs.
Luckily, there’s a workaround to this limitation. This includes deleting the old virtual machine while preserving all its related resources. Then, creating a new virtual machine with a new name and old resources such as IP address and Disks.
In this article, you'll learn how to rename Azure VMs with some good old PowerShell scripting. Let’s get started.
Requirements
If you plan to follow along with the examples and demos, here are some basic requirements.
- An Azure subscription. You can request for a trial if you don’t have one yet.
- An Azure VM to be renamed. Not that I need to remind you but, don’t use a production server, please? If you don’t have a test VM yet, please refer to Create a Windows virtual machine in the Azure portal on how to create one.
- Windows PowerShell 5.1 or PowerShell Core 6+. I am using PowerShell 7.0.0-preview.6 in my test environment.
- The Az PowerShell module.
- A script editor of your choice. I am using Visual Studio Code on my PC. Use whichever one you’re comfortable with.
Step 1: Backing Up the Old Virtual Machine Properties
It's important to back up the current virtual machine properties. Remember that these properties include the OS Disk ID, the OS type, and VM size to name a few. Having a backup is essential to restore the same values to the resulting virtual machine.
Connect to Azure PowerShell first before running these commands. Please refer to Sign in with Azure PowerShell for details. Select the Azure subscription to use using the Select-AzSubscription cmdlet.
Using your editor, create a new PowerShell script and copy/paste the below code into it.
First, define the name of the virtual machine and the resource group that owns it. In my tenant, I have demo-mail1 (virtual machine) inside demo_group (resource group).
# Resource Group Name
$ResourceGroupName = 'demo_group'
# Virtual Machine Name
$VirtualMachineName = 'demo-mail1'
Then, this next command will export the Azure VM properties to an XML file. Save it somewhere on your computer that you can find later on. The code below saves the VM settings to *C:_Backup.xml*.
# Export VM properties
Get-AzVM -ResourceGroupName $ResourceGroupName -Name $VirtualMachineName | Export-Clixml C:\Demo\VM_Backup.xml -Depth 5
Now you have a backup of the original VM properties that you can use as a reference when needed. Use the command below to import the backup XML file into a variable named $oldVM.
# Import VM settings from backup XML and store it in a variable
$oldVM = Import-Clixml C:\Demo\VM_Backup.xml
Step 2: Deleting the Old Virtual Machine
Now that you have backed up the old virtual machine details, the next step is to delete the old virtual machine.
In the previous step, the old virtual machine details were imported to the $oldVM variable. We’ll use this object as a reference to delete the old virtual machine. Use this next command to remove the virtual machine.
# Delete the Old VM
Remove-AzVM -ResourceGroupName $oldVM.ResourceGroupName -Name $oldVM.Name
The code above deletes the virtual machine matching the name and resource group of the old virtual machine that is in the $oldVM variable. When completed, the screenshot below shows what you’d expect as a result.
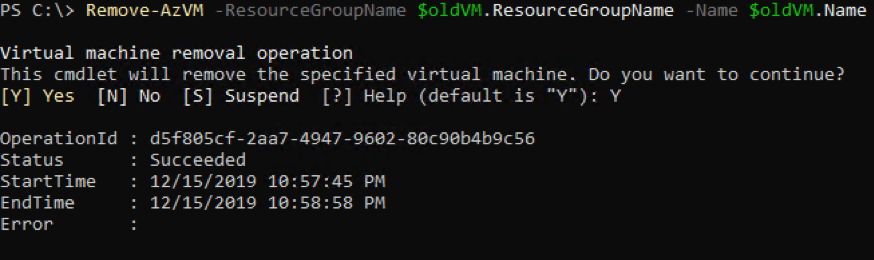
The screenshot above shows that the virtual machine was removed.
You might be asking “what about the other resources connected to the virtual machine that was deleted?”. Don’t worry because those resources are left unchanged.
The previous command only deleted the virtual machine. You can confirm by looking for them in the Azure portal under the resource group.
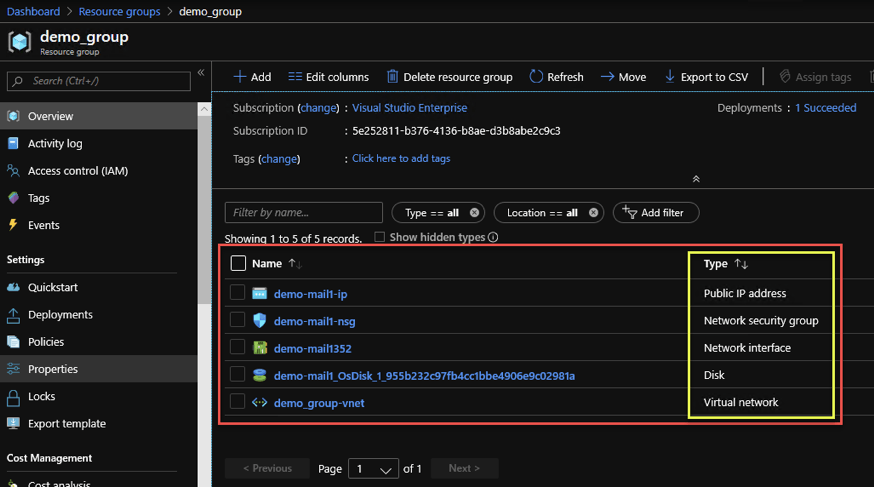
As you can see in the above screenshot of the Azure portal, only the Virtual Machine is missing from the list. All the other resources are intact. These resources will be connected to the new virtual machine manually once it is created.
Step 3: Creating the New Virtual Machine
Deleting the virtual machine also freed up the resources previously associated with it. In this section, you’ll package the new virtual machine properties before creating it.
To initiate a new VM configuration, copy/paste the script below. Make sure to change the $newVMName value to the new name you want to assign. I am using the name demo-mail2 in this example.
# Set the name of the new virtual machine
$newVMName = 'demo-mail2'
# Initiate a new virtual machine configuration
$newVM = New-AzVMConfig -VMName $newVMName -VMSize $oldVM.HardwareProfile.VmSize -Tags $oldVM.Tags
Next, attach the OS Disk that was previously attached to the old virtual machine to the new one. Use the code below to do that.
# Attach the OS Disk of the old VM to the new VM
Set-AzVMOSDisk -VM $newVM -CreateOption Attach -ManagedDiskId $oldVM.StorageProfile.OsDisk.ManagedDisk.Id -Name $oldVM.StorageProfile.OsDisk.Name -Windows
Now, attach the network interface using this next line of code.
# Attach all NICs of the old VM to the new VM
$oldVM.NetworkProfile.NetworkInterfaces | % {Add-AzVMNetworkInterface -VM $newVM -Id $_.Id}
And finally, attach any data disks that were present in the old VM.
# Attach all Data Disks (if any) of the old VM to the new VM
$oldVM.StorageProfile.DataDisks | % {Add-AzVMDataDisk -VM $newVM -Name $_.Name -ManagedDiskId $_.ManagedDisk.Id -Caching $_.Caching -Lun $_.Lun -DiskSizeInGB $_.DiskSizeGB -CreateOption
Attach}
At this point, the new virtual machine specs are packaged in the configuration stored in the $newVM variable. Using this next code snippet will trigger the creation of the new virtual machine.
# Create the new virtual machine
New-AzVM -ResourceGroupName $ResourceGroupName -Location $oldVM.Location -VM $newVM
The VM creation may take a few minutes. When it’s done, the screenshot below shows the expected output of a successful VM creation.

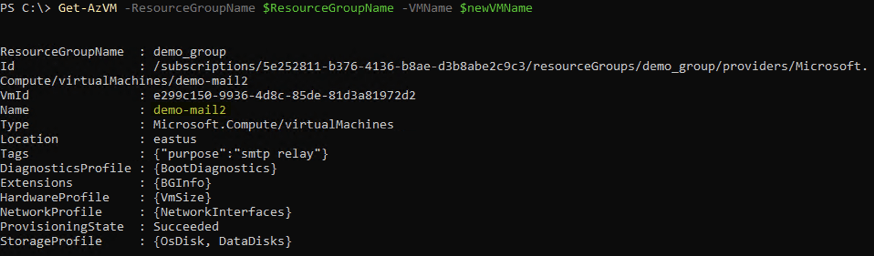
You can confirm the existence of the new VM by running the Get-AzVM command below.
Get-AzVM -ResourceGroupName $ResourceGroupName -VMName $newVMName
As you can see in the example output below, the VM with name demo-mail2 is present.
Other Considerations
The steps outlined above are basic and in general. There might be other important details that need to be included in the renamed virtual machine.
Some settings can only be set during the creation so these must be carefully considered too before going through all these steps. One example is the Availability set to which the VM can be added only when the VM is created.
Additionally, renaming the VM using this procedure does not automatically rename the computer name in the OS. When the renamed VM is back on, consider changing the computer name.
Summary
In this article, you have learned several things about the process of renaming an Azure virtual machine. You’ve learned how to backup the VM configuration to file for later reference, delete a VM, package a new VM configuration and creating a new VM.
We also touched on some possible considerations before going though the whole process of renaming a VM. In the end, the chance of success of renaming the VM depends increases with carefully planning.
Thank you for reading!